Showing posts with label Ideas to Share. Show all posts

Monday, July 5, 2010

Muffin Tin Monday - OR, MD, HI, MA and AK

Our Muffin Tin Monday was actually on a tray, because the dessert was too big for anything else!!!

My poor kids!!!   ha ha

Anyhow, it's been a while since I have done a States theme, I was excited to get them going again.
And for this one I was able to try something I have heard of, but never had before.

Can you guess what it is?


In our tin:

Massachusettes: Corn Muffins (the official muffin of the state)
Hawaii: Pineapple
Oregon: Sand dollar sandwiches (for Seaside Oregon, where you can gather TONS of these)
Maryland: Popcorn Shrimp
Alaska: Baked Alaska

The girls were excited to show off their sea shells (in honor of the sand dollar in their lunch).


Soooooo, the item I have never tried before is the Baked Alaska!!!

Can I just say ... YUM!!!
My goodness - what a fabulous dessert!

I was trying to make mine muffin tin sized, so this is what I did:
(mind you, it was still too big for the tins in the end)

Individual Baked Alaskas:

1. Baked LARGE chocolate cupcakes.

2. Once cooled, I put the cupcakes in the freezer to get them fairly cold (not frozen, though).


3. I cut off the top of the cupcake and scooped out the insides.

4. Then I filled the insides with Strawberry Ice Cream (I REALLY recommend this flavor combination).


5. I put the cupcake top back on and carefully smoooooshed the two pieces back together.

8. Then, freeze the cupcakes until they get really firm.


9. When they are ready, start the meringue. I used 5-6 egg whites and a dash of Cream of Tartar. I mixed that until is was really foamy and white (but not stiff). Then I added 1 cup of sugar and let that beat until I got stiff, glossy peaks. Preheat the oven to 500F while this is going on - it moves rather quickly at this point. 

10. I set the cupcakes on a baking sheet (top sides down) and then covered each one with a layer of meringue, using the spoon to make them look pretty.

11. Then place in the hot oven just until they are browned to your liking (~ 5 min).


12. Eat them up right away ... what a treat! I can't believe I've never had Baked Alaska before!!!


Want to see other muffin tin meals?
Go to Muffin Tin Mom!


Thursday, February 18, 2010

A Little Piece of My Heart

is back where it belongs!


(thanks Debbie for the Lego Heart - CUTE!!!!)

Yay, at long last, I found my camera.

But not before missing out on all the Valentine's fun!

(sigh)

Oh well - it's all good.

And since we made some extra valentines (and still haven't passed them out) - at least, I can remember the day we spent making these little guys:


And then yesterday we finally had a Muffin Tin meal for the week (because Monday and Tuesday were very busy days), however, I kind of wish I didn't have my camera - kind of pathetic - and they didn't like the pink grapefruit!


But, things cheered up when a cute little pig came to visit.


And he had some friends (thanks to Family Fun for the darling idea) - who we quickly shared with our friends. Seriously - how can I even try to drop some poundage with a whole batch of these sitting on my counter???


(note: the snout is made with a giant marshmallow, cut in half ...
I dipped the non-cut side in water and then in pink sugar and let them dry before using them ...
 and the ears are pink candy melts - spread out kind of thin and once they set I broke them into triangular pieces,
but you could use pink starbursts, or gum or anything ...
 I just wanted to use something that my sweet brace-face could eat)

Anyhow, I feel slightly more functional again.

WHEW!

Tuesday, December 8, 2009

Another Ornament ... you know, for kids!!!

And if anyone knows what movie I am referencing in the title (besides my husband and sister),
 you totally deserve a prize!!!

(It's in my Top 10 Movies of all time - Seriously!!!)
(and most people haven't seen it - how sad)

Anyhow ...

I signed up to help Thing 1's class make ornaments, and after trying to figure out how to do one particular project, and realizing that it wouldn't work, this is what finally came to mind!
And thankfully, it worked!

Here's what you need for one ornament:

6 Glittery paper strips, 3/4 of an inch by 6 inches
1 Glittery chenille stem (pipe cleaner ... whatever)
6 beads* of one color (A)
5 beads* of another (B)
Hole Punch (the smaller, the better)

*Note: use beads with a small hole, these will work much better!

First, I put a bead (A) on the chenille stem about 1 inch from the end. I folded it over and twisted them together so that the bead was on the bottom.

Then, I punched holes in the paper strips, one on each end of each paper. Stack them together and put them on the stem, the pretty side of the paper facing the bead.


Then you put on the remainder of the beads, EXCEPT for the last one.
You should start and end this middle section with a (B) bead.


Then you bring the other end of the paper strips to the chenille stem,
and bring the stem through all of the papers.


Fan out the papers, and


add the very last bead (A) ... pushing down to the papers (it keeps the paper in place).


Then fold the rest of the chenille stem in half, twist it together just above the last bead,
forming a lovely loop for hanging.

And there you have it!


These were super easy, super cheap
and I made them with 25 3rd graders in less than 20 minutes!

Wahoo!

Friday, December 4, 2009

Cookies!

That's all I need to say, right?

It's that time of year, my kitchen is operating at it's highest level of the year ... how about you?

My neighbors have been, too (YAY) - so we pooled our resources (in the form of a Cookie Exchange) and some good things happened.

For instance, my plate of Fudgie Brownie Bites


magically transformed into an assortment of delectable goods!


And my kitchen was NOT declared a disaster - WHEW!

We also decided to throw in a little White Elephant game and I was able to snag the lump of coal! Seriously, I wanted it so that my kids would know what they were getting if they were naughty - sometimes, we all need a little visual reminder!


Now, if you are interested in those Fudgie Brownie Bites, they are pretty easy to make. I first came across the recipe at a lovely, little creative place (The Craft Patch), and it has since become a favorite to make and share. This is how I make them up:

Fudgie Brownie Bites


You start with a sheet of your favorite brownies - either a mix or from scratch ... doesn't matter. I just use the recipe from the OLD Better Homes and Gardens Cookbook - super simple, super basic, super tasty!

When they come out of the oven, let them sit for about 15 minutes, then it's time to cut. First cut around the edges (the edge is not going to work for the brownie bites), then cut the insides into one inch squares.


This is the fun part, pick up each square, while they are still warm, and SMOOSH it (yes, that IS a word) into a ball! Do this with all of your brownies and set them out on wax or parchment paper.


In a double boiler, you will need to melt one bag of chocolate chips (I REALLY prefer the semi-sweet, but you could use milk chocolate), one can of sweetened condensed milk, 2 Tb. butter and 1 tsp. of vanilla. Stir it until it is all smooth (you could do this in the microwave). Then dip each brownie into the chocolate. I just dip the top 3/4 of the brownie - not the whole thing. And let them set for a little while.


At this point you could be done. Or you sprinkle on some powdered sugar, or finely chopped nuts, or drizzle some white bark on them. I opted for this, using some Christmas colors, just to liven them up a bit!


They are really quite an easy treat to make, and they always get rave reviews!


I only wish I would have crushed up some peppermint sticks and added them to the dipping chocolate, that would have been a very festive brownie!


And the best part of this recipe (for those of you who like the brownie edges), you have lots of leftover pieces to nibble on!!!


Tuesday, December 1, 2009

Don't Forget Fido


One of the best parts of Christmas is the baking!
(As my belly can well attest to.)

And today, for the first time ever, I baked for my doggie.
 (And I think I will do it again.)

We had a school assignment to make dog biscuits
for a local animal adoption center.
(By we, I mean Thing 2 and 2 boys from her class.)

We spent an hour mixing and baking
(and putting up with lots of silliness) 
and they actually turned out!
(This I know from the fact that my dog was able to sneak a few of them from off the counter when they were cooling -
naughty dog!)


Here is the recipe we used:

Homemade Dog Biscuits

Ingredients:
1/3 cup margarine, softened
1 cup oatmeal
3 1/2 cups flour
1 egg
1/2 cup milk
1 cup chicken broth
1 cup shredded cheddar cheese

Method:
Mix the margarine, oatmeal and 1 CUP of the FLOUR until it is crumbly. Stir in the egg, milk and chicken broth. Add another cup of flour. Stir in cheese. Add the remaining flour and stir until it is well mixed.
Sprinkle a rolling pin and rolling surface with more flour. Roll out dough until it is 1/2 inch thick and cut into shapes with cookie cutters. Place shapes on GREASED cookie sheets. Bake at 325 degrees for 25-30 minutes.
Let cool completely. Store in a brown paper bag in the refrigerator to keep them fresh!

Saturday, November 28, 2009

Decking the Halls ... or Tree, in our case

It's That Time of Year ... as you know,
and to get us in the spirit of things, we made ornaments for our Christmas Tree!

The beauty of this project (other than the actual outcome)
we have everything we needed on hand - YAY!

(I saw this in my Family Fun magazine for this month and adapted it just a wee little bit.)

What you will need:
Toilet paper cardboard rolls
3 pipe cleaners (2 of one color, 1 of a different color)
Hole punch
Scissors
Glue and Glitter
Q-tips (to apply the glue)


You start with an empty toilet paper roll, on per ornament.
Draw lines dividing it into 8 even (or somewhat even) sections.
Punch holes on each end of each drawn segment.
Then cut the segments off.


String the segmets onto the pipe cleaner that you only have one of.


Run the end of the pipe cleaner back into the first segment and twist it off
INSIDE the segment.


Snip off the ends.
Now, twist your two remaining pipe cleaners together to make one LONG pipe cleaner.


Run this pipe cleaner through the outer holes.


When you have done that, twist off the ends and make a little loop.


Add glue to the edges ...


... and sprinkle on the glitter.
(hint, if you want to make multiple colors, only glue the segments for each specific color at one time)


Let them set for a little while, and ...


... add them to your Christmas Tree!
Very festive for recycled goods, I think!

Thursday, October 15, 2009

Candy Corn Jello

I just had to play around with the Jello today ...
I had a little idea come to mind and wanted to see if I could bring it to fruition.


Little Jello Candy Corns ... only with a fruity taste.

I used unflavored gelatin for the white part, adding some clear fruit juice, sour cream and a titch of sugar. The other layers were made with lemon and orange flavored Jello.

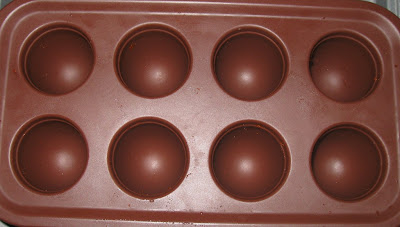
I did one layer at a time, using my new handy-dandy
silicone brownie molds - I love these things!!!


I started with the white layer, when it was set I added the yellow,
and when that was set I added the orange.

Easy peasy ...

And tasty, too!

And they didn't all turn out perfect, but the kids didn't care so much about that.
Just as long as they were edible!


And they were!

Tuesday, September 29, 2009

Mini Pumpkins

Are you ready to start carving pumpkins yet?


Okay, it might be a little early, so here's a project you can do to get it out of your system. That way you can wait a few more weeks until it's actually
closer to Halloween!

The first thing you need to do is gather some acorns ... this works really well for us because I just sent the kids out with a bucket and said if you fill it, we will decorate them. And they did ... and we did ...
all 460 of them!

I spread them out over a tarp in our back yard and used two different shades of orange spray paint on them.


When they were dry, we pulled out the Sharpies
and went to work decorating these little pumpkins.


Everyone got in on this activity,
even Dad did a few when he got home from work.


Everyone had their own style and they were all so fun!


It seemed a little slow at first, but we stuck with it and by the end of the evening, our bucket was full (now there's a metaphor)!

We bagged them up and they were ready for Thing 2 to sell at school today, as they are having a little market of sorts while they study money and currency.

Hopefully they are a BIG HIT!


The worst parts of the project:
All the little worms that were kicked out of their homes when we painted them.
It took a while to decorate 460 of these little guys.
The best parts of the project:
It was great motivation for the kids to get the acorns gathered off our lawn!
We could all participate.
They are just so cute and little!!!
They are pumpkins ... did I mention that I love pumpkins?

... NOTE: SHE SOLD ALL OF HER PUMPKINS ...

p.s. - I found this project at Family Fun!