Showing posts with label Recipes. Show all posts

Friday, December 4, 2009

Cookies!

That's all I need to say, right?

It's that time of year, my kitchen is operating at it's highest level of the year ... how about you?

My neighbors have been, too (YAY) - so we pooled our resources (in the form of a Cookie Exchange) and some good things happened.

For instance, my plate of Fudgie Brownie Bites


magically transformed into an assortment of delectable goods!


And my kitchen was NOT declared a disaster - WHEW!

We also decided to throw in a little White Elephant game and I was able to snag the lump of coal! Seriously, I wanted it so that my kids would know what they were getting if they were naughty - sometimes, we all need a little visual reminder!


Now, if you are interested in those Fudgie Brownie Bites, they are pretty easy to make. I first came across the recipe at a lovely, little creative place (The Craft Patch), and it has since become a favorite to make and share. This is how I make them up:

Fudgie Brownie Bites


You start with a sheet of your favorite brownies - either a mix or from scratch ... doesn't matter. I just use the recipe from the OLD Better Homes and Gardens Cookbook - super simple, super basic, super tasty!

When they come out of the oven, let them sit for about 15 minutes, then it's time to cut. First cut around the edges (the edge is not going to work for the brownie bites), then cut the insides into one inch squares.


This is the fun part, pick up each square, while they are still warm, and SMOOSH it (yes, that IS a word) into a ball! Do this with all of your brownies and set them out on wax or parchment paper.


In a double boiler, you will need to melt one bag of chocolate chips (I REALLY prefer the semi-sweet, but you could use milk chocolate), one can of sweetened condensed milk, 2 Tb. butter and 1 tsp. of vanilla. Stir it until it is all smooth (you could do this in the microwave). Then dip each brownie into the chocolate. I just dip the top 3/4 of the brownie - not the whole thing. And let them set for a little while.


At this point you could be done. Or you sprinkle on some powdered sugar, or finely chopped nuts, or drizzle some white bark on them. I opted for this, using some Christmas colors, just to liven them up a bit!


They are really quite an easy treat to make, and they always get rave reviews!


I only wish I would have crushed up some peppermint sticks and added them to the dipping chocolate, that would have been a very festive brownie!


And the best part of this recipe (for those of you who like the brownie edges), you have lots of leftover pieces to nibble on!!!


Wednesday, September 23, 2009

Eenie, Meenie, Minie, Zucchini!

A few weeks ago I was asked to teach a class on Zucchini ... really, I was! So, that last few weeks I have been collecting recipes and ideas from all over and have put them together. I figured I might as well share with anyone out there who might be wondering what to do with all the zucchini their garden might have produced. There are some pretty good recipes and ideas.

Here are a few of my favorite ideas:

First things first ... Freeze it

Either shredded or pureed - both can be handy at a later date.


Then there was the Pizza ... Yes, my kids loved it!


Just shred it on with all the other toppings you like to have.


Third we have a Stuffed Zucchini ... mixed reviews (mine was a YAY!)

I found this recipe HERE!

And finally ... Zucchini Soup!

This was a winner with the cooking class, it was fresh and creamy
and had a simple, but satisfying taste. I found it HERE.
Another winner was the Zucchini Quiche ... I have that recipe in the whole packet I made for the class (only, for the record, I added bacon, as everything is better with bacon ... IMHO). If you are interested in looking at all the recipes I collected (included a TDF Chocolate Cake), I have attached a PDF of it below:

(warning, it isn't pretty, but it is comprehensive)

Tuesday, September 8, 2009

Pretty in Pink

Bake at 350

This is a post from earlier this month and I feel a little intimidated sharing it (especially since it is about cookies ... what I am thinking?) with Bake @ 350 ... but I have wanted to play along with the Flavor of the Month Party, I just keep running out of month! So when I saw that the theme was John Hughes Films and that I had already posted this, well, I had to join in on the fun!!! I was a HUGE John Hughes fan, ever since Sixteen Candles. Being an awkward red-headed teenager, his films gave me HOPE! As silly as it sounds, I adored Molly, I wanted to be just like her, and I gained some confidence knowing that blondes don't have to have ALL the fun, there's some room for us Reds, too!
So, here is my shout-out to John Hughes - his films were legendary!

Ohhhhh ... I finally made something Pretty! It's taken me a while, I know. I have made funny things, interesting things, silly things, creative things, even cute things, but I really haven't done so well with the pretty things.
Until now ...

These might seem a little more on the Valentine-ish side, but I had a need for something lovely, so I decided to give them a try. I made my own cookie recipe (from my mom) and then used THIS frosting recipe from a television program that aired a few months ago. And, lo and behold, it worked! The frosting was simple and tasty, and it was pretty, too!

{{{Contented sigh}}}

And of course, my Mom's cookie recipe:

Super Soft Sugar Cookies

2 c. sugar
2 sticks butter
2 eggs
7 c. flour
1 tsp. salt
4 tsp. baking powder
2 tsp. baking soda
2 tsp. vanilla
1 c. milk

Cream together the sugar, butter and eggs until fluffy. In a separate bowl mix the dry ingredients. Add to the creamy mixture alternately with milk and vanilla. Mix until blended, then chill the dough in the refrigerator at least one hour. When ready, roll out dough to 1/4 inch thickness, cut as desired. Bake at 375 F for 5-10 minutes until lightly browned.

And now, you can watch the segment from the TV show mentioned above,

if you want to, of course:


Thursday, May 28, 2009

Have You Tried Fried Ice Cream?

I don't know what it is about this dessert, but every once in a while I just have to have some!


Then, on our trip to Arizona, we had some at a restaurant in Tucson, and I have been craving it like crazy since then.

I had tried to make it a few years ago without much luck. However, I gave it another go and met with success!!!


Here's what I did:
I put a bunch of corn flakes in my food processor with an equal amount of rice krispies. I got it all into lots of little pieces and then added some sugar and cinnamon ... just until it had the right taste for me.
I set the crumbs out in a shallow dish and started working with the ice cream.
First, I scooped out 6 nice round scoops. Then I hurried and rolled them around in the crumbs. Then they went right into the freezer for a while. When they had become very solid and frozen, I took them out and rolled them in beaten egg whites and then in the crumb mixture again. I set them in the freezer again for a time and then they were ready to fry.
I just used regular canola oil, however, I want to try it again with peanut oil, we'll see. I filled a 1 qt. sauce pan with oil and let it heat for several minutes until it was ready (I had it on a medium heat setting). Then I used a wire spoon and lowered the ice cream ball into the oil for about 10 seconds.
That was it, they were ready to serve. And, much to my surprise they were great. We just added a little chocolate syrup, but whipped cream and fresh fruit would be a great addition to this dessert.
So, give it a try, it is so yummy! (and so good for you, I am sure)
And while I'm sharing a little Mexican treat, I thought I would share an easy, non-fried taco salad shell idea.
Start with the tortillas you have to cook yourself.

When they are crispy on both sides, hurry and set one on an inverted bowl and press the sides down along the sides of the bowl. Let it set for a few minutes while you cook a few more tortillas, and ...


You have a cute, tasty shell for taco salad. This one isn't fried, that way you don't have to feel guilty about eating the fried ice cream for dessert!


Thursday, May 14, 2009

You Gotta Try These ...

I have found a FABULOUS baking blog, Bake at 350, that is going to make sure I don't lose any more weight. How Cruel! But I can't hate her because the stuff on her blog is just divine ... okay, maybe not divine ... but really, really, really good.

And then there's her cookies!!!
WOW WOW WOW!
She sells them now, too!


Anyhow, I have always been a fan of Hostess Cupcakes (sadly, I know) and have thought about trying to make them myself. I know they aren't healthy and home-made ones won't magically become healthy, but they will cut out all the preservatives, no shelf life on these babies - that works for me! I can handle the cupcakes and frosting, and even the icing, I just wasn't quite sure what to do for the cream filling.

She answered that question here!


I made these for Mother's Day, and we gobbled them up that very day. Instead of the cute curly icing, I just added words that described some of the important women in my life, there were more, but these are the ones you get to see!

Just for the record, I used the chocolate cake recipe on the Hershey's Cocoa box, it always works. And I used a different ganauche ... I guess it's not really a ganauche, but I love the taste and texture and use it on other things all the time!

My Faux Ganauche:
1 bag semi-sweet or bitter chocolate chips
1 can sweetened condensed milk
3 Tb. butter
2 tsp. vanilla

Melt the chocolate and butter together in a double boiler, add the milk and stir until smooth. Add the vanilla and stir again until smooth - how easy is that?

So, if you want to try them, and I am pretty sure you do, go to Bake at 350 for her instructions ... no need to recreate the wheel here folks!

Saturday, April 4, 2009

I Could Write a Sonnet about your Easter Bonnet ...

... however, since it is made out of these, I think I'll just eat it instead!


Oh Yeah!


Somewhere in the big old world wide web, I came across the idea of making Easter bonnet cookies using peanut butter cups.


However, since I have never seen a BROWN easter bonnet,

(the example I saw had brown bonnets
... love chocolate, but still ...),


here's my attempt at a lighter, more dainty little bonnet.

Key word here: attempt ;)


I turned to my old friend, Bark Coating and I gave it a little yellow tint.


Then I covered the peanut butter cups in the melted coating.

If you use toothpicks, put the pick in at an angle,
as that makes it soooo much easier to remove onto waxed paper.


And FYI: This step needs to be quick, or else the chocolate will start to melt.

I even put the peanut butter cups in the freezer before using them,

just to be on the safe side.


So, in, then out, and onto wax paper to set.


Now, you will need a cookie to use as a base
and plenty of frosting, pink and blue and yellow worked for me.

(You can use store bought cookies,
I have a cheaters example at the end of this post using
store bought cookies and I really liked it!)


Here's a little action shot of our messy work area.


To assemble, I put a huge gob of frosting on the bottom of the peanut butter cup and then placed it on the cookie. The frosting would ooze out just enough to create a "ribbon" looking edge around the hat.


Then I added flowers, lots of flowers!


And pretty soon we had ourselves a bit of an Easter Parade.


Bonnets were all over the place!


The kids wanted in on the action, so I handed over the frosting and put them to work.


Thing 1 did pretty good!


The Boy made a work of art!


Thing 2 had some cute bonnets, but she ate one right away!


And The King wondered where his cookie was!
Too bad buddy, maybe next year!


Okay, now as mentioned, I have a few Cheater versions ... YAY!


Cheater #1

Just use a store bought cookie - I loved the scalloped edge -
very dainty!


Cheater #2

Don't dip the Reeses, just take advantage of the pretty pastel colored foil wrappers the peanut butter cups come in for Easter.
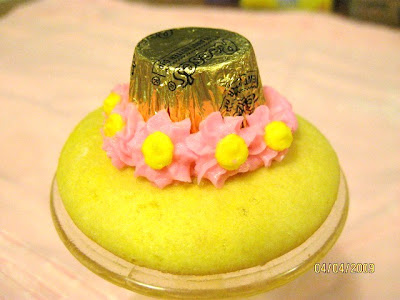


Finally ... The Ultimate Cheater:
Store bought cookie AND no dipping ... couldn't be much easier than that and they are still quite lovely, I think!

I'll be watching for your Easter treat,
I always love fun ideas!

Sunday, February 15, 2009

Valentine's Fun

This was our special Valentine's dessert - we actually had it Sunday, but it was worth the wait! I have the recipe at the bottom of this post because it really is that good. The cake recipe is from Southern Living and it ALWAYS works and it ALWAYS tastes good. It's fun to dress it up differently - this is what we did with it for Valentine's!


All that cake made us a little sleepy ... ahhhhhh, nappy time!


Ohhhh - I just want to nibble on those toes!


Now, turning back the clock to Friday, this is Thing 1 trying to figure out what is going on at her class party ... I loved that look on her face and snapped a quick shot.


She figured out what was going on and "jumped" right in on the fun!


She even helped The Boy have a fun time.


Thing 2 was also there - here she is running in the halls - I figure I can use this as blackmail - I'll show it to her principal if she starts slackin' at home.


Don't you love those little hats they made - class parties were a huge success!!!


They even let The Boy play Bingo! He was pretty happy! (and he won - he didn't realize he had won, but he won)
Now, the recipe for Perfectly Easy Golden Cake
Ingredients:
1 1/2 cups sugar
1 cup vegetable oil
2 large eggs
2 cups self-rising flour
1 cup milk
1 tsp. vanilla extract
fresh strawberries
Method:
First: set oven to 350F and grease and flour your baking pans (I use 3 round pans).
Beat sugar and oil in mixer until well blended. Add eggs, one at a time, until nicely blended. Add flour and milk (a little bit at a time) alternating between the two, beginning and ending with flour. When it is all blended, set the mixer at medium and let it mix for 4 minutes. When it's done, stir in the vanilla.
Spoon in the cake mixture evenly into your cake pans, thump them on the counter a few times to get out air bubbles and pop them in the oven. Bake for about 24 minutes, they will be a lovely golden yellow and slightly bouncy if you poke your finger in the middle of the cake. You can also do the toothpick test.
Cool in pan for 10 minutes then transfer to cooling racks.
NOTE ... I took a little tip from Bakerella - in working with layers, I sprayed some sugar water on the top of each layer to help maintain its moisture - easy to do and is a great little trick.
I put down my first layer, sprayed with sugar water, covered with a light layer of buttercream frosting (whipping cream would be a much lighter alternative and taste just as good, maybe even better - although I would probably eat more because it wasn't as rich) and then covered that with sliced strawberries. I did another layer just the same. The third layer was sprayed and frosted, then I just put strawberry halves all over the top. I didn't frost the sides because that would have been tooooooo much, even I have my limits. It was perfect just the way it was.
Serve it up with a glass of milk, eat, enjoy, and then take the left over half to your sister-in-law and her family because you will eat the rest if it stays in your home! Get a hug and kiss from your darling niece for providing a dessert for them, too!
Moist, flavorful, pretty and delish!